Starting a blog is easy! Set up your own food blog in 3 easy steps (with over-the-shoulder, step-by-step screen shots included). Plus, get additional tips, tools and resources that every new blogger needs.
Please note that some of the links in this post are affiliate links and I will earn a commission if you purchase through these links (at no additional cost to you). Thank you for your support!
Are you ready to start your own blog?
You’re in the right place.
I started my own blog in 2017 and can give you my real-deal experiences with getting started — as a beginner.
My growth trajectory has been on the slow-and-steady side, since I am a full-time stay-at-home mom of two toddlers, and I also do a fair amount of freelance work for clients from home, so my time to dedicate to the blog sort of ebbs and flows.
But I can tell you that with focused time, energy, an eagerness to learn, and the right guidance and tools, you can create your own very rewarding online business.
Notice how I put the word “time” in bold above?
That’s because it does take a lot of time, hard work, and patience.
You’ll find all sorts of bloggers claiming all sorts of “get rich quick” or “selling the dream” methodologies. I’m not going to say that 100% of those claims are incorrect. But I do caution you to be wary of them.
In my experience, doing what it takes to create and manage a successful blog is a lot of work, and those overnight success stories you may read about are not the norm. But, if you’re passionate about it, it can be very rewarding work.
Ok, ready to start your blog? Here we go!
Start a Blog in 3 Easy Steps
Step 1: Pick a domain name and set up hosting
For your domain name, think of something that’s:
- relevant to what your blog is about
- easy to remember
- easy to spell
- keep it short
You can use this widget to see if the domain name you’d like is available now!
For hosting, I recommend starting with Bluehost. For a new food blogger, I’ve found Bluehost to offer exactly what I need: inexpensive monthly hosting costs to manage a blossoming blog. You can take advantage of their intro offer that brings their hosting costs down to $2.95/month, which can’t be beat for a beginner!
Click here to get started with Bluehost now at a discounted price of $2.95 per month, with a 30-day money back guarantee! (affiliate link)
Once you’re more established, and your traffic starts to increase, you can always shop for other hosting services and plans.
A hosting company I see recommended quite a bit for more established blogs is Cloudways. I don’t have any personal experience working with them, but NerdPress recommends them, as do quite a few other bloggers out there.
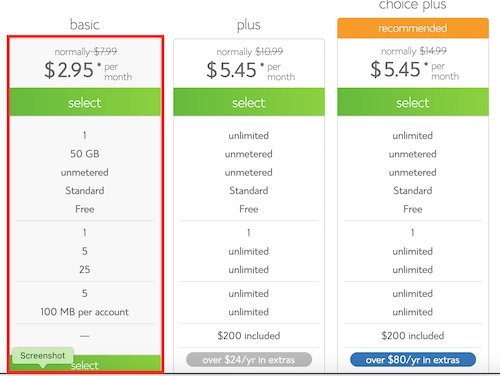
But, back to Bluehost. Head on over to Bluehost and select your plan. (Note: If you choose Bluehost as your host, they’ll throw in your domain name for free! Win!)
I recommend starting with the Bluehost “Basic” Plan.
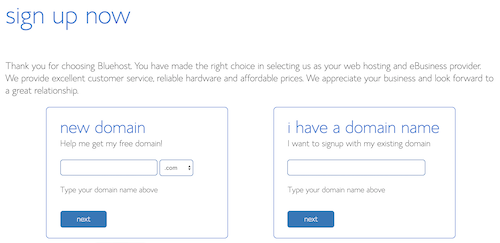
Then, you’ll be prompted to enter either a new domain name (box on left), or a domain name you already own (box on right). Here’s what that screen looks like:
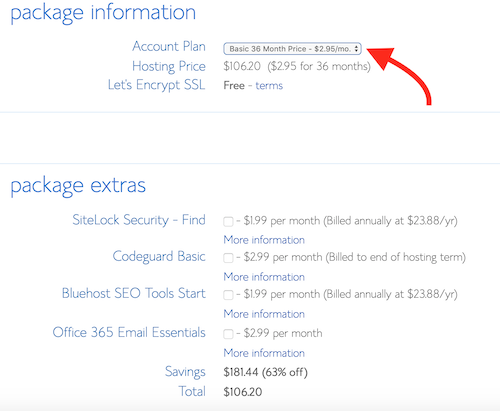
Next, you’ll be prompted to fill out your basic account information. Then, on the following screen, I went with the 36-month pre-paid option to lock in the $2.95/month in savings. If any of the package extras are checked, you can uncheck any that you don’t want. I personally didn’t purchase any package extras. See the options I went with below:
Congrats! You’ve completed Step 1 — you have your domain name and your hosting plan all ready to go!
Step 2: Install WordPress
Once your domain name and hosting is all set, the next step is to install WordPress — your blogging program. With Bluehost, they make this process very slick and easy.
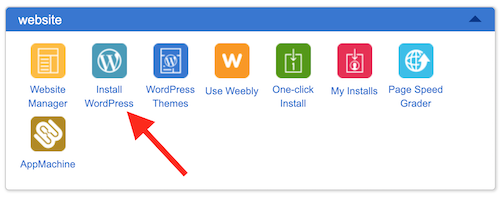
Go to my.bluehost.com and log in to your Bluehost Control Panel (cPanel). In your Dashboard, navigate to the “Website” section and click on the icon that says “Install WordPress.”
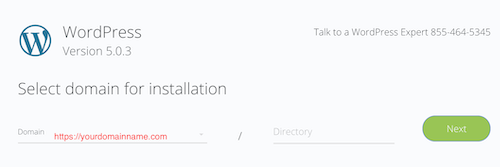
Next, select the domain you’re using in the drop-down (if you purchased a domain with your hosting set-up, it should appear here). And click “Next.”
Then, continue to follow the prompts to complete your installation.
Once the installation is complete, you’ll end up on a screen where your Login Credentials are listed. Write these down or save them somewhere, because these are what you’ll need in order to log in to your new WordPress dashboard.
You should also receive a confirmation email with all of this vital information.
Congrats! You’ve now install WordPress and you should have a really basic website all ready to go. But, you don’t want a basic website, so that’s where the next step comes in… choosing a theme and installing it so that you can customize the look of your brand new site!
Step 3: Choose a theme
WordPress offers a bunch of free themes you can choose from, but I’d recommend shopping around for a premium theme. For Flavorpalooza, I went with:
The Genesis Framework and the StudioPress Theme called the Foodie Pro Theme.
Check it out and see if you like it, too! It has all the features I was looking for, since Flavorpalooza is primarily a food blog.
Click here to buy the Genesis Framework + the Foodie Pro Theme now! (affiliate link)
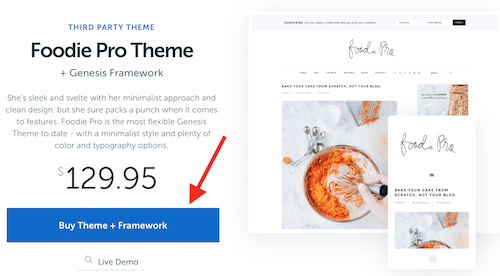
Note: The step-by-step directions below are specific to the Genesis Framework and the Foodie Pro child theme, but the general set-up flow would be very similar regardless of the theme you purchased.
After you’ve purchased Genesis and Foodie Pro, you’ll need to install Genesis first, followed by your child theme (in this case, Foodie Pro).
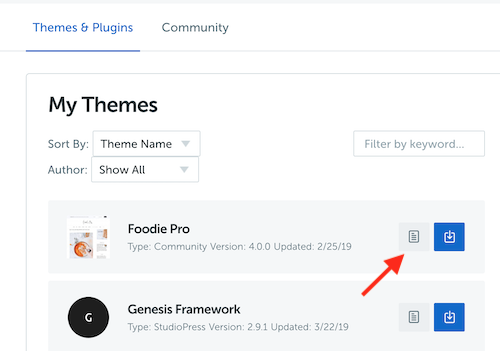
From your StudioPress dashboard (make sure you’re logged in), click the blue download button next to each zip file you want to download (one for the Genesis framework, and one for Foodie Pro). Both downloads should happen automatically.
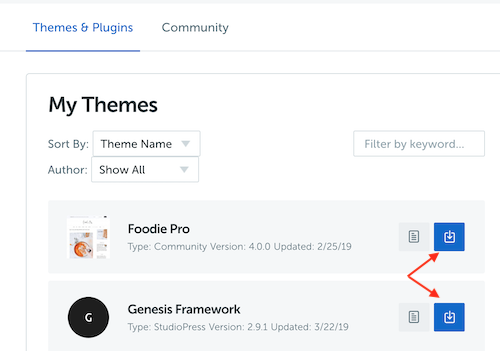
Next, from within your WordPress dashboard, you’ll need to install the Genesis framework first.
In your WordPress dashboard menu, navigate to Appearance > Themes and click “Upload” in the menu at the top:
![]()
Then:

Then, click the “choose file” button and select the Genesis zip file you downloaded. And then, “Install Now.”
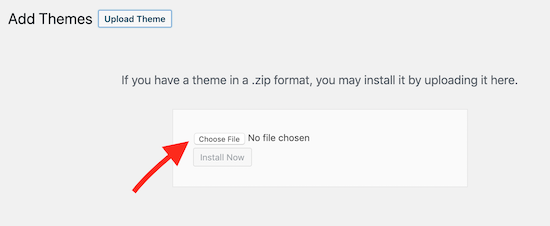
Once it’s finished installing, you can click activate if you want to, but it’s not necessary. You just need to make sure Genesis is installed at all times. Then, you’ll want to repeat the upload process again to install the Foodie Pro zip file.
This time, when Foodie Pro is finished installing, click “Activate.”
Hooray! You’re done! Now, it’s time to customize everything. To make your website look like the Foodie Pro demo site, you can go back to your StudioPress dashboard and click the Setup Instructions button next to your child theme’s name to get detailed instructions.
Have fun tweaking things and customizing them!
Plugins I Use
I’m constantly trying out new plugins, but here are a few that I 100% recommend:
Akismet Anti Spam – protects your blog from getting spammed.
WP Recipe Maker – an excellent recipe plugin that’s well supported.
Yoast SEO – for optimizing your website for the search engines.
Other Tools I Recommend
Grammarly – This is a great tool that has a lot of excellent free and paid options to ensure you’re putting your best foot forward and looking as professional as possible through your writing. It’s essentially a browser extension that helps you check spelling, punctuation, grammar mistakes, word choice and more.
MailChimp – Building an email list is so important, so get a lead magnet (a free eBook, cheat sheet or printable) ready to go that you can use to entice new subscribers, and manage your list and send out valuable updates to your readers via MailChimp. I’m currently using MailChimp because they offer free plans, which is great for beginners, but I plan to switch to ConvertKit once I build my list up. I’ve used ConvertKit professionally and it’s amazing!
Tailwind – What a time saver! Tailwind makes pin scheduling on Pinterest a breeze. I still like to pin manually on Pinterest as well, but I also like to use Tailwind to automate things a bit. You can also use it to automate Instagram, but I haven’t used it for that yet. You can test Tailwind out yourself before purchasing too, which is awesome. They offer a free trial that’s based on 100 scheduled Pins or 30 scheduled Instagram Posts. Click here to try Tailwind out for free!
Canva – This has to be one of my favorite tools of all time. The free version is amazing. I use Canva all the time to create graphics for my blog, add text to photos, customize my social media headers, and, probably most importantly, to create eye-catching pins on Pinterest.
Blogging Resources
Food Blogger Pro – I first joined Food Blogger Pro in (gosh) 2014 I think? It’s an amazing resource for new and seasoned food bloggers. They offer tons of over-the-shoulder style video trainings to help you not only get started, but to take your food blog to the next level. Also, they have *very* active forums filled with fellow food bloggers that you can utilize to ask questions and get the support you need. It’s like having awesome friends and coworkers that you can lean on. They open for enrollment throughout the year, so put your name on the waiting list if enrollment isn’t currently open. The membership is not inexpensive, but, to me, I think it’s worth every penny.
If the membership is too pricey for you to start, Food Blogger Pro also has a podcast that’s totally free that you can check out. I’ve learned a lot just from listening to the podcast.
Food Photography
Ok. So if you look at the photos on my recipes, they obviously still need some work. But, I am still proud of where I am with them, because photography isn’t a skill I have naturally, and there’s So. Much. To. Learn. when it comes to food photography, from camera equipment to lighting to backdrops to food styling.
To get you started, I highly recommend checking out the Pinch of Yum Tasty Photography eBook. Lindsay’s food photography on Pinch of Yum is awesome. And I really enjoy her writing style, so she’s someone I love learning from.

I hope you found this guide useful! I plan to continue adding to it as I discover more tools and resources to share.
Drop a link to your new blog in the comments so I can check it out!
Hello, my name is Doreen and I have a peanut and tree nut allergy. I just recently came across your website and it’s so helpful and precise. Thank you for the suggestions and and options for some many products. Do you have any suggestions for fast food restaurants that you would consider safe to eat at with a nut allergy? Your suggestions would be greatly appreciated.
Thank you, Doreen