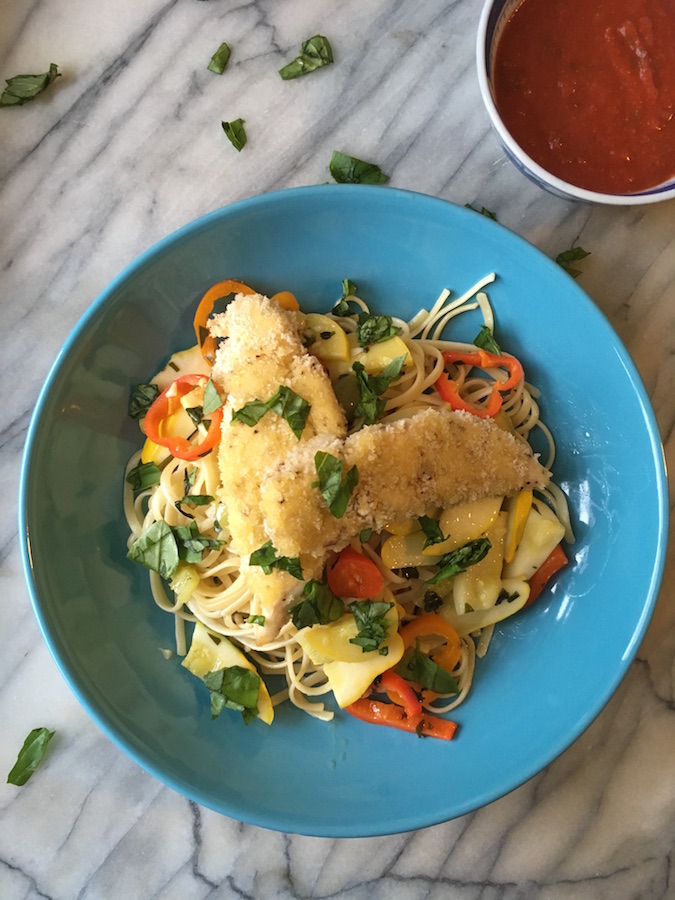
You might call them breaded chicken fingers, breaded chicken strips or breaded chicken tenders, but the result is the same: an easy and delicious, toddler-friendly dinner option!
My 3 year old has a peanut allergy, so buying frozen chicken fingers and chicken nuggets and such, or hitting up a fast food joint, isn’t always a safe option for us. Plus, homemade is healthier and tastier, right?
I also love that they can easily be plated as finger food for toddlers (with fun dipping sauces!) or served up a little bit fancier for the adults at the table (like with this recipe here, served atop linguine and sautéed summer vegetables). You can also slice them up and add them to salads. Or, simply serve them up over pasta with marinara and melted mozzarella, chicken parm-style. The possibilities are (almost) endless.
BREADING TIPS: For the breading process, I like to get out two plates (one for the flour and one for the breadcrumbs), and one wide, shallow bowl (for the egg). Place the flour, then the egg (whisked), then the breadcrumbs (mixed with the Parmesan cheese) in an assembly line and then begin the breading process. Pick up each chicken tender, coat it in flour, dip it in your egg mixture and then coat it in your breadcrumb/Parmesan cheese mixture. Once each tender is breaded, place in your oiled baking pan and continue with the next chicken tender until done.
ALLERGY NOTES: For the breadcrumbs, we always use Kikkoman Panko bread crumbs. They have an excellent allergen chart on their website, so it’s a product we’ve deemed safe for our family’s situation. To make this recipe gluten free, you can try Kikkoman Gluten Free Panko
and use King Arthur gluten free flour
. I haven’t tried breading using an egg replacer yet, so I’m not sure how this recipe would be for an egg-free situation, but I’ll experiment with that soon and keep you posted!
Note: Some of the links above are Amazon affiliate links, but the recommendations are completely genuine.

Breaded Chicken Fingers Pasta Bowl
Kid-friendly breaded chicken fingers, served on top of linguine with seasonal veggies.
Ingredients
For the chicken:
- 1 package chicken tenders
- 1 cup flour
- 1 egg
- 1 ½ cups Panko breadcrumbs
- ¼ cup Parmesan cheese
- Olive oil
- Salt and pepper
For the pasta:
- 1 lb package of linguine
- 2 cloves of garlic, minced
- Assorted summer veggies, sliced (Pictured: yellow squash, baby bell peppers)
- 2 tablespoons olive oil
- Salt and pepper to taste
Instructions
- Preheat the oven to 350°F.
- Lightly dust each chicken tender with salt and pepper and set aside, as you prepare your breading.
- Coat the bottom of a baking pan with olive oil and set aside.
- Coat each chicken tender in flour, then egg, then breadcrumb/Parmesan mixture (see post for additional breading tips), and place in your oiled baking dish.
- Bake in oven for approximately 15 to 20 minutes, turning once. You’ll want an internal temperature of 165°F.
- While your chicken is baking, prepare the pasta, sauté the garlic and veggies in some olive oil and season with salt and pepper to taste.
- Toss pasta and veggies together and top with chicken tenders.
Notes
Note: Garnish with chopped fresh herbs, like basil and parsley, to boost the flavor!
Optional: Side of marinara for dipping.
Nutrition Information
Yield 5 Serving Size 1Amount Per Serving Calories 532Total Fat 16gSaturated Fat 4gTrans Fat 0gUnsaturated Fat 11gCholesterol 48mgSodium 565mgCarbohydrates 78gFiber 6gSugar 5gProtein 18g
This nutrition label is a product of an online calculator. Even though I try to provide accurate nutritional information to the best of my ability, these figures should still be considered estimates.
Leave a Reply